
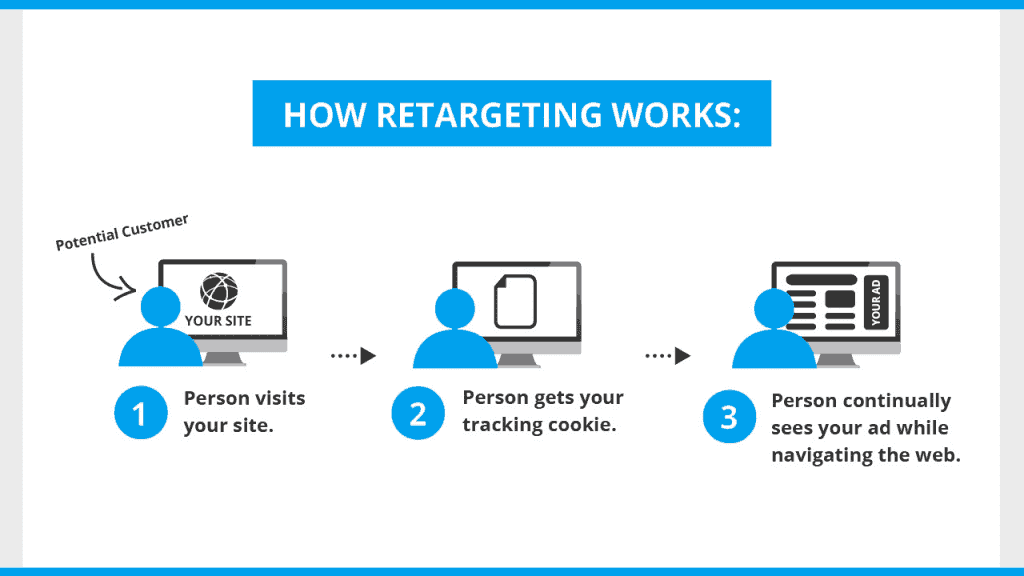
Google isn’t reading your mind. It’s remarketing.
One minute, you’re shopping online for a new pair of black sneakers. Then, you change websites or start scrolling social media. As if by magic, there’s an advertisement for the same shoes you were just looking at!
- What Is Remarketing?
- Step 1: Define Your Campaign Type
- Step 2: Select Your Audience and Goals
- Step 3: Setup Your Remarketing Tag
- Step 4: Create Your Remarketing List
- Step 5: Create Your Display Remarketing Campaign
- Make Your Remarketing Campaign Work for You
96% of web visitors won’t take action on your site. This means you need a different way to make them remember and return to you.
This guide covers remarketing strategies that can transform your outreach.
What Is Remarketing?
Remarketing and retargeting are related but distinct strategies. Let’s cover the basic definitions.
Remarketing
Remarketing is online advertising that sends targeted ads to people who have visited your site. You’ll work with a third-party ad network to display relevant ads as users click around the web. This is a great way to recapture visitors after you buy traffic for your site.
With Google remarketing, your ads appear on websites in the Google Display Network. They’ll also show up on relevant Google search results. As a result, your brand stays top-of-mind long after that initial interaction.
However, some businesses can’t use remarketing for legal purposes. If you’re in the alcohol, gambling, or medical device market, you’re likely restricted. Review Google’s Personalized Advertising Policy to learn more.
Remarketing vs Retargeting
Retargeting is one form of remarketing. With this method, you’ll use both cookies and display ads to promote your product or service across the web.
The main difference is your targeting scope. You’re not only targeting people who previously engaged with your site. You’re also engaging with those who exhibit similar online behavior. Most often, retargeting centers on pay-per-click advertising like Google Ads.
Here’s an example: Your company sells floor lamps. You set an online conversion goal for visitors to click your Call-to-Action button leading to an email signup page.
Using data analytics, you discover that visitors who click your CTA also visit other lighting sites. These might be home improvement websites, DIY resources, and more.
With retargeting, your third-party ad network displays ads for your products on those sites. You catch the eye of people interested in your inventory who haven’t visited your site yet. As a result, your inbound traffic grows.
Remarketing campaigns reconnect with visitors and turn them into loyal customers. Utilizing longtail keywords for better visibility in your online ads can enhance your reach. By targeting specific phrases potential customers search for, you attract more qualified leads. This strategy boosts engagement and elevates your brand’s presence in a competitive market.
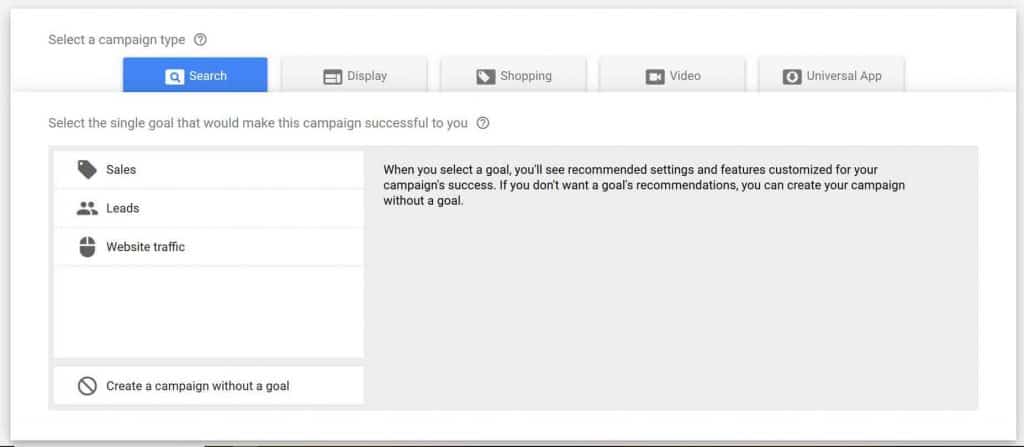
Step 1: Define Your Campaign Type
Google Ads remarketing offers multiple forms of outreach. You can use display ads to reach your target audience via the following platforms:
- Search
- Display
- Shopping
- Video
- Universal App
Use any of these to your advantage. However, some are easier to execute than others. For example, you can set up a Display Network remarketing campaign quicker than a Video one.
Step 2: Select Your Audience and Goals
Decide which web visitors you want to send targeted ads to. These groups will be your audiences. You can break them down into any category that makes sense for your company.
In general, there are three main audience categories:
- People who did not take the desired action on a page
- People who reached a certain stage of your checkout process, but abandoned their cart along the way
- People who visited one page of your site, but didn’t click on a page you wanted them to see
Define these audiences so you know what action you want them to take. With this data in hand, you’re ready to move onto the next phase.
Step 3: Setup Your Remarketing Tag
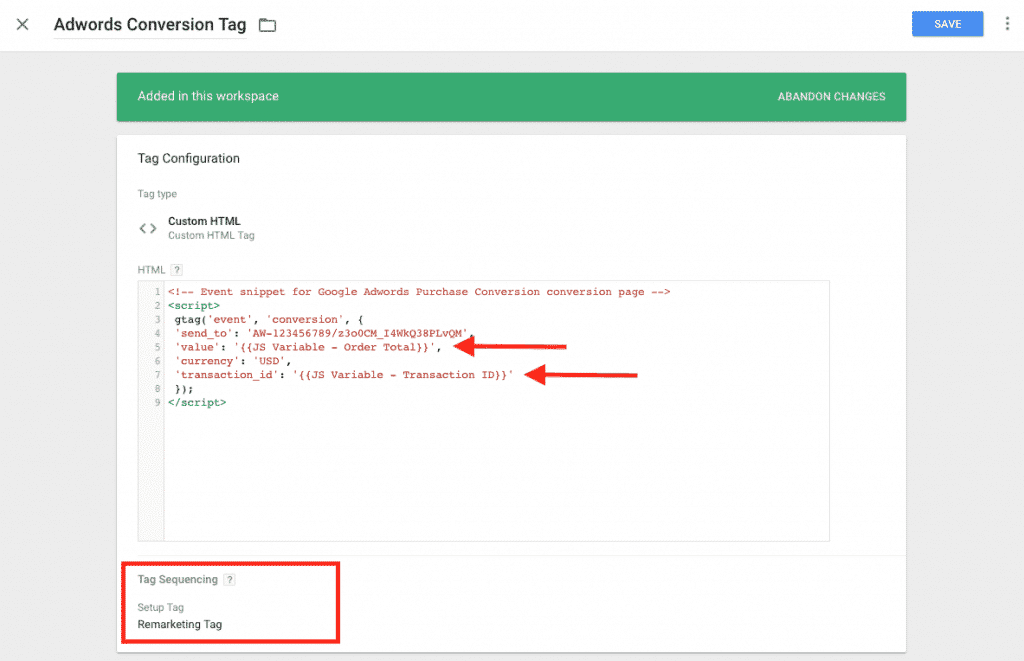
You must create a global remarketing tag before creating remarketing lists in Google Ads. Begin by logging into your Google Ads account. If you’re still using the old Google AdWords interface, switch to the Google Ads Experience.
Look at the icon in the upper righthand corner. If it’s a wrench, you’re in Google Ads Experience. If it’s a gear icon, click it and follow the directions to upgrade.
Once ready, click the wrench. Select “Audience Manager” below the Shared Library. Then click “Audience Sources”.
There are two main ways to remarket to your website visitors.
Google Analytics
If you’re already using Google Analytics, this option uses your existing tag. This means you don’t have to install anything new on your site.
Google Ads Tag
If you select this option, the wizard will populate a Google Ads tag. Copy it and paste it between the <head></head> tags of every page on your website. With this remarketing pixel in place, Google can track all visitors for future remarketing.
Once you’ve chosen your tag form, select between these two options:
- Collect standard data available from this data source
- Collect specific attributes or parameters to personalize ads
Choose the first option unless you’re an online retailer with thousands of products and a Google Merchant Center feed. You can still personalize your ad campaigns!
Step 4: Create Your Remarketing List
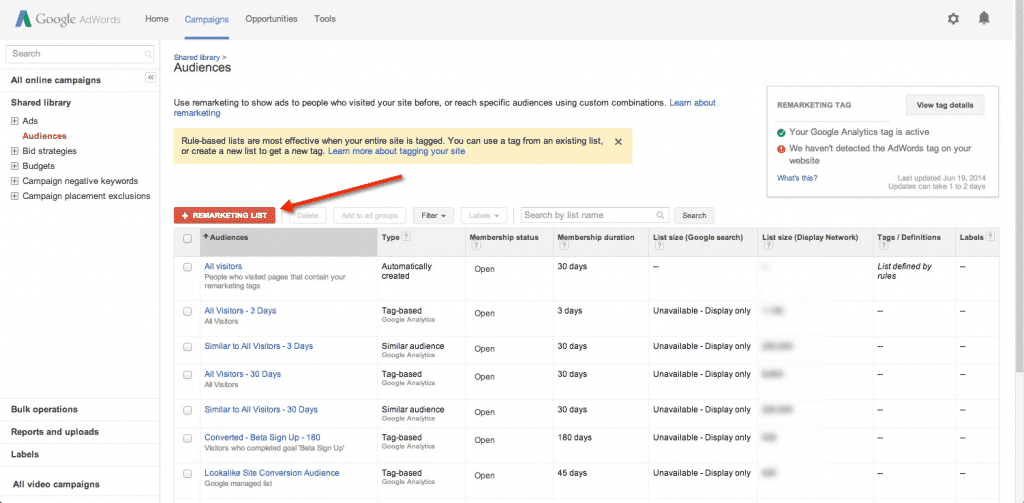
With the tag created, you’re ready to create your list. If the code is new, it may take a few days to populate your audiences.
Here are the steps to follow when you’re ready to create your list:
Click the plus sign under “Audience Lists” to add a list. Then select “Website Visitors”. When the page opens, enter a name describing the group (e.g. “Cart Abandoners”). Use the drop-down menu to define the rule for visitors you want to track. For example, track everyone who visits URLs containing “/landingpage/”. Click “Add” when you complete the rule. Enter the number of visitors you want to track in a set period. For example, capture leads from the past 30 days. Enter a membership duration for how long you want to target these customers. Add a description of your audience (optional). Click “Create Audience”.
Creating Your Remarketing List with Google Analytics
You can also build your remarketing list within Google Analytics. The process differs because Google Analytics breaks your audience into segments.
One segment might be people from a certain country or time zone. You may also segment by visitors who visit certain pages or stay for a set duration.
Define these segments before you start tracking them. Once you’ve tracked them for a while, turn them into remarketing audiences with Google Ads. First, log into your Admin Menu and navigate to “View Segments”. Here, you’ll find assets you can use for remarketing.
The asset used to build a remarketing list on Google Analytics is “Custom Segment”. Click here, then click the “Actions” button next to it. Hit “Build Audience”. From here, you can see how each segment performs and create your remarketing lists.
Tracking All Non-Converters
You may want to target all non-converters rather than defining a custom audience. Most steps stay the same, with a slight variation at the beginning.
On step 2 above, select “Custom Combination” instead of “Website Visitors.” Name your audience “All Non-Converters.” Under “Audiences to Combine,” select “All Visitors.” That’s the first part of the custom combination.
Next, add a new audience by clicking the blue “And” box. For your new audience, click the drop-down menu. Select “None of these audiences” and then “All Converters.” Double-check your settings and save the audience.
Your final setup screen should include these selections:
Any of these audiences: All visitors
AND
None of these audiences: All converters
As a result, you’ll track all site visitors except the people who converted.
Step 5: Create Your Display Remarketing Campaign
With your remarketing lists created, it’s time to get your campaign rolling. From within the Google Ads interface, click “Campaigns”. Then click the large blue plus sign.
Select your campaign type from Step 1 above. For this example, let’s create a Display campaign. Click “Display: Run different kinds of ads across the web”.
Click “Create Campaign Without a Goal” to see all options later. If you have a specific business goal, scroll through the options to find one that fits. Next, choose the “Standard Display Campaign” subtype. You don’t need to enter your URL at this point.
Give your remarketing campaign a name. Select the locations and languages you want to target.
Navigating the Bidding Section
Click “Manually Set Bids” in the Bidding section. Opt for “Manual CPC” and enable Enhanced CPC. Note that CPA and Target ROAS are good automated options for maximizing conversions or revenue.
You’ll be prompted to enter your average daily spend. Because you’re paying for clicks, start small and increase as you gauge effectiveness.
Under the daily budget prompt, click “Additional Settings”. Focus on “Frequency Capping“. This setting limits how often a user sees your ads. Stick to around four to five impressions per day, per ad group to avoid burnout and overspending.
Finalizing Your Ad Group
Name your ad group. Under “Audiences”, select “People who have previously interacted with your business and similar audiences”. Select your remarketing audience and click “Done”.
One way to keep your remarketing campaign effective: Change the automated targeting section to “No automated targeting” on the final setup page. Otherwise, Google will target users outside your defined audience, increasing your spend.
Choose a cost-per-click bid for your campaign. A standard CPC bid is between $0.50 and $1.00 per click. Add your prepared ad under “Create Your Ads” or return later. Click “Create Campaign” and you’re done!
Make Your Remarketing Campaign Work for You
Remarketing can propel your business to new heights. It amplifies conversion numbers and improves visibility.
The best part? Setting up the system is straightforward. Once the foundation is in place, you can tweak it as necessary with minimal work.